11 KiB
目录
- 思维导图
- 概述
- 启动方式及生命周期
- startService 方式启动
- bindService 方式启动
- 混合启动
- 疑问
- startCommand 返回值含义
- bindService 第三个参数含义
- startForegroundService
- FOREGROUND_SERVICE 权限申请
- onStartCommand 必须调用 startForeground 构造通知栏
- 非绑定服务
- 常见问题汇总
- 如何保证 Service 不被杀死
- 参考
思维导图
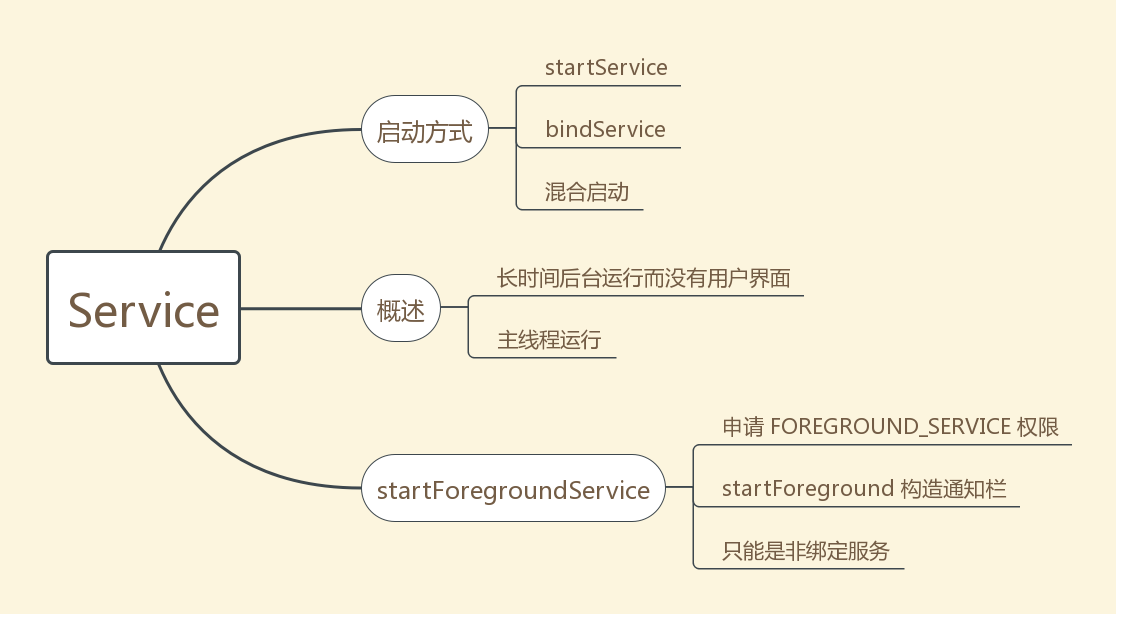
概述
Service 是一种可以在后台长时间运行而没有用户界面的应用组件。它有两种启动方式,第一种方式是 startService 启动服务,服务启动后,会在后台无限期运行,直到通过 stopService 或者 stopSelf 停止服务。另一种方式是 bindService 绑定服务,组件与服务绑定在一起,服务的生命周期受组件影响,如果组件被销毁了,服务也就停止了。
Service 是运行在主线程中的,因此不能执行耗时任务,如果想执行耗时任务,可以使用 IntentService。
启动方式及生命周期
startService 方式启动
当应用组件通过 startService 方法来启动 Service 时,Service 则会处于启动状态,一旦服务启动,它就会在后台无限期的运行,生命周期独立于启动它的组件,即使启动它的组件已经销毁了也不受任何影响,由于启动的服务长期运行在后台,这会大量的消耗电量,因此,我们应该在任务执行完之后调用 stopSelf 来停止服务,或者通过其他应用组件调用 stopServcie 来停止服务。
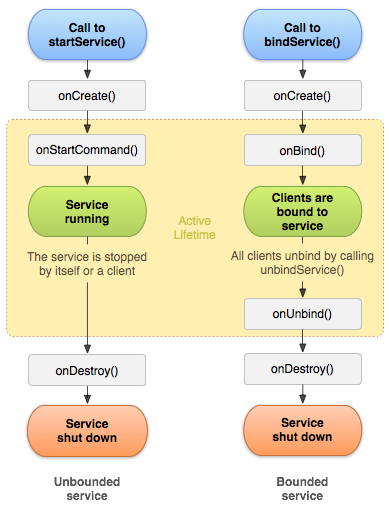
通过这种方式启动 Service 生命周期是:
onCreate、onStartCommand、onDestory。
首次启动服务的时候,系统会调用 onCreate 方法,多次启动不会在调用 onCreate 方法,只会调用 onStartCommand,onStartCommand 被调用后,服务就启动起来了,将会在后台无限期的运行,知道通过 stopService 或者 stopSelf 方法来停止服务。当服务被销毁时,将会回调 onDestory 方法。
多次调用 startService(Intent) 会回调 onStartCommand 方法,而多次调用 stopService 只有第一次会回调 onDestory 方法。
bindService 方式启动
即将启动组件和服务绑定在一起,前面讲的通过 startService 方式启动的服务是与组件相独立的,即使启动服务的组件被销毁了,服务仍然在后台运行不受干扰,但是通过 bindService 方式绑定的服务就不一样了,它与绑定组件的生命周期是有关的。
多个组件可以绑定到同一个服务上,如果只有一个组件绑定服务,当绑定的组件被销毁时,服务也就会停止了。如果是多个组件绑定到一个服务上,当绑定到该服务的所有组件都被销毁时,服务才会停止。
通过这种方式启动 Service 生命周期是:
onCreate、onBind、onUnbind、onDestory
onBind():当其他组件想通过 bindService 与服务绑定时,系统将会回调这个方法,在实现中,必须返回一个 IBinder 接口,供客户端和服务进行通信,必须实现此方法,这个方法是 Service 的一个抽象方法,但是如果不允许绑定,返回 null 就好了。
onUnbind:当所有与服务绑定的组件都解除绑定时,就会调用此方法。
多次 bindService 并不会回调任何方法,多次 unBindService 则会 Crash。
实例:
-
创建服务
其实就是在 onBind 方法中返回 IBinder 实例
public class MyBindService extends Service { private static final String TAG = "MyBindService"; @Override public void onCreate() { super.onCreate(); Log.i(TAG, "onCreate: "); } @Override public int onStartCommand(Intent intent, int flags, int startId) { Log.i(TAG, "onStartCommand: "); return super.onStartCommand(intent, flags, startId); } @Override public IBinder onBind(Intent intent) { Log.i(TAG, "onBind: "); return new MyBinder(); } @Override public boolean onUnbind(Intent intent) { Log.i(TAG, "onUnbind: "); return super.onUnbind(intent); } @Override public void onDestroy() { super.onDestroy(); Log.i(TAG, "onDestroy: "); } public class MyBinder extends Binder{ public String getInfo(){ return "Info"; } } } -
绑定服务
绑定服务需要提供一个 ServiceConnection 接口,在接口回调中获取 Binder 对象,与服务进行通信。
    private MyBindService.MyBinder mMyBinder;
    //绑定/解除绑定 Service 回调接口
    private ServiceConnection mConnection = new ServiceConnection() {
        @Override
        public void onServiceConnected(ComponentName name, IBinder service) {
            //绑定成功后回调
            //1.获取 Binder 接口对象
            mMyBinder = (MyBindService.MyBinder) service;
            //2.从服务获取数据
            String content = mMyBinder.getInfo();
            //3.界面提示
            Toast.makeText(MainActivity.this, content, Toast.LENGTH_SHORT).show();
        }

        @Override
        public void onServiceDisconnected(ComponentName name) {
            //解除绑定后回调
            mMyBinder = null;
        }
    };

    bindService(intent, mConnection, Context.BIND_AUTO_CREATE);
    unbindService(mConnection);
混合启动
如果一个服务被启动又被绑定,onCreate 方法只会执行一次,startService 调用多少次,onStartCommand 就会执行多少次,调用 stopService 并不会回调 onDestory,unBindService 可以。
疑问
onStartCommand 返回值
返回值的取值其实已经定义在了 Service 基类中了,常用的有:
-
START_NOT_STICKY
如果系统在 onStartCommand 返回后终止服务,则除非有挂起 Intent 要传递,否则系统不会重建服务。这是最安全的选项,可以避免在不必要时以及应用能够轻松重启所有未完成的作业时运行服务。
-
START_STICKT
如果系统在 onStartCommand 返回后终止服务,则会重建服务并调用 onStartCommadn,但绝对不会重新传递最后一个 Intent。相反,除非有挂起 Intent 要启动服务,否则系统会通过空 Intent 调用 onStartCommand。这适用于不执行命令、但无限期运行并等待作业的媒体播放器等。
-
START_REDELIVER_INTENT
如果系统在 onStartCommand 返回后终止服务,则会重建服务,并通过传递给服务等最后一个 Intent 调用 onStartCommand。任何挂起 Intent 均依次传递。这适用于主动执行应该立即恢复的作业的服务,例如下载文件。
bindService 参数
    public boolean bindService(Intent service, ServiceConnection conn,
            int flags) {
        return mBase.bindService(service, conn, flags);
    }
前两个参数就不用多说了,第三个参数一般传 Context.BIND_AUTO_CREATE。
它的值是一些枚举值,
startForegroundService
单独拿出来说,逼格高吧。
回到正题,最开始使用这个方法时,不是 Crash 就是 ANR,头大!
首先使用前台服务,必须申请 FOREGROUND_SERVICE 权限,这是普通权限,未申请则会引发 SecurityException。
ANR 的解决
使用前台服务,必须提供一个通知栏,不然五秒就会 ANR。
    public int onStartCommand(Intent intent, int flags, int startId) {
        Log.i(TAG, "onStartCommand: ");
        NotificationManager mNotificationManager = (NotificationManager) getSystemService(Context.NOTIFICATION_SERVICE);
        // 通知渠道的id
        String id = "my_channel_01";
        // 用户可以看到的通知渠道的名字.
        CharSequence name = "Demo";
        // 用户可以看到的通知渠道的描述
        String description = "Desc";
        int importance = NotificationManager.IMPORTANCE_HIGH;
        NotificationChannel mChannel = new NotificationChannel(id, name, importance);
        // 配置通知渠道的属性
        mChannel.setDescription(description);
        // 设置通知出现时的闪灯(如果 android 设备支持的话)
        mChannel.enableLights(true);
        mChannel.setLightColor(Color.RED);
        // 设置通知出现时的震动(如果 android 设备支持的话)
        mChannel.enableVibration(true);
        mChannel.setVibrationPattern(new long[]{100, 200, 300, 400, 500, 400, 300, 200, 400});
        mNotificationManager.createNotificationChannel(mChannel);

        // 通知渠道的id
        String CHANNEL_ID = "my_channel_01";
        // Create a notification and set the notification channel.
        Notification notification = new Notification.Builder(this, CHANNEL_ID)
                .setContentTitle("New Message").setContentText("You've received new messages.")
                .setSmallIcon(R.drawable.ic_launcher_foreground)
                .build();
        startForeground(1, notification);
        return super.onStartCommand(intent, flags, startId);
    }
准确的来说,应该是必须调用 startForeground 方法。
既然我是写在 onStartCommand 方法里面,就说明这是一个启动服务非绑定服务,所以可以多次调用 startForegroundService 方法,调用一次 stopService 即可停止服务。
Crash 的解决
Crash 的报错如下:
android.app.RemoteServiceException: Context.startForegroundService() did not then call Service.startForeground(): ServiceRecord
这是由于我在 startForegroundService 之后就 stopService,在 Service 中并没有构造通知栏导致的。
总结
使用前台服务,有三点需要注意:
- 申请 FOREGROUND_SERVICE 权限,它是普通权限
- 在 onStartCommand 中必须要调用 startForeground 构造一个通知栏,不然 ANR
- 前台服务只能是启动服务,不能是绑定服务
常见问题汇总
- 如何保证 Service 不被杀死
- 在 Service 的 onStartCommand 中返回 START_STICKY,该标志使得 Service 被杀死后尝试再次启动 Service
- 提高 Service 优先级,比如设置成前台服务
- 在 Activity 的 onDestory 发送广播,在广播接收器的 onReceiver 重启 Service
参考
Android Service和IntentService知识点详细总结
Context.startForegroundService() did not then call Service.startForeground?